Version 14.19
Overview
This section of template design demonstrates the edit or addition of follow up tasks associated to a template.
Add a Follow Up
- Review the Follow up tab.
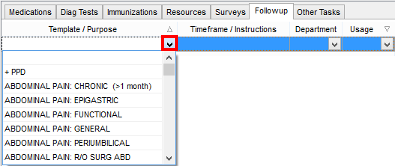
- Click the Followup tab.

Encounter Template Editor: Assess/Plan Followup Tab
- Click the Insert Record button
 .
.
Note: You may also click into the add new record field.
|

- Select a follow up Template from the Template/Purpose drop-down menu. If there is no template to select for the follow up, you may type in the Template/Purpose field. If a template is selected, the appointment will be made using the selected template.
- Type instruction for follow up in the Timeframe/Instructions field.

- Select a Department from the drop-down menu.
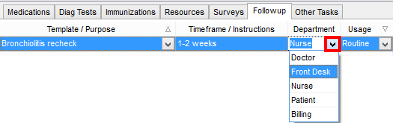
Encounter Template Editor: Department
- Click the dropdown arrow and select a Usage.
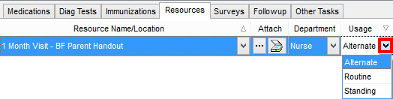
Encounter Template Editor: Usage
| Usage | Definition |
|---|---|
| Alternate | Will show the item in the task window. An alternate item needs to be selected at time of charting. |
| Routine | Will show the item in the task window with a checkmark already selected in the add box. A routine item is selected for task submission at time of charting. |
| Standing | A standing order is submitted as a task to the selected department when the template is used at time of charting. |
- Click the Post edit button
 .
.
Edit a Follow Up
- Review the Follow up tab.
- Click the Followup tab.

Encounter Template Editor: Assess/Plan Followup Tab
- Click to highlight the follow up to edit.
- Click the dropdown arrow in the Template/Purpose field, select a template or type the purpose.
- Add or edit the Timeframe/Instructions.
- Click the dropdown arrow in the Department field, select a Department.
- Click the dropdown arrow in the Usage field, select a Usage.
- Click the Post edit button .
Delete a Follow Up
- Review the Follow up tab.
- Click the Followup tab.
Encounter Template Editor: Assess/Plan Followup Tab
- Click to highlight the follow up to delete.
- Click the Delete record button.
Version 14.10
Overview
This section of template design demonstrates the edit or addition of follow up tasks associated to a template.
Add a Follow Up
- Review the Follow up tab.
- Click the Followup tab.
Encounter Template Editor: Assess/Plan Followup Tab
- Click the Insert Record button .
 | You may also click into the add new record field.  |
- Click the dropdown arrow in the Template/Purpose field and select a follow up template.
Encounter Template Editor: Assess/Plan Followup Template Selection
 | If there is no template to select for the follow up, you may type in the Template/Purpose field. If a template is selected, the appointment will be made using the selected template. |
- Type instruction for follow up in the Timeframe/Instructions field.
Encounter Template Editor: Assess/Plan Timeframe/Instructions
- Click the dropdown arrow and select a Department.
Encounter Template Editor: Department
- Click the dropdown arrow and select a Usage.
Encounter Template Editor: Usage
| Usage | Definition |
|---|---|
| Alternate | Will show the item in the task window. An alternate item needs to be selected at time of charting. |
| Routine | Will show the item in the task window with a checkmark already selected in the add box. A routine item is selected for task submission at time of charting. |
| Standing | A standing order is submitted as a task to the selected department when the template is used at time of charting. |
- Click the Post edit button .
Edit a Follow Up
- Review the Follow up tab.
- Click the Followup tab.
Encounter Template Editor: Assess/Plan Followup Tab
- Click to highlight the follow up to edit.
- Click the dropdown arrow in the Template/Purpose field, select a template or type the purpose.
- Add or edit the Timeframe/Instructions.
- Click the dropdown arrow in the Department field, select a Department.
- Click the dropdown arrow in the Usage field, select a Usage.
- Click the Post edit button .
Delete a Follow Up
- Review the Follow up tab.
- Click the Followup tab.
Encounter Template Editor: Assess/Plan Followup Tab
- Click to highlight the follow up to delete.
- Click the Delete record button.